


At the heart of every ultrasound machine lies its most
critical component the ultrasound transducer or probe. A probe’s performance
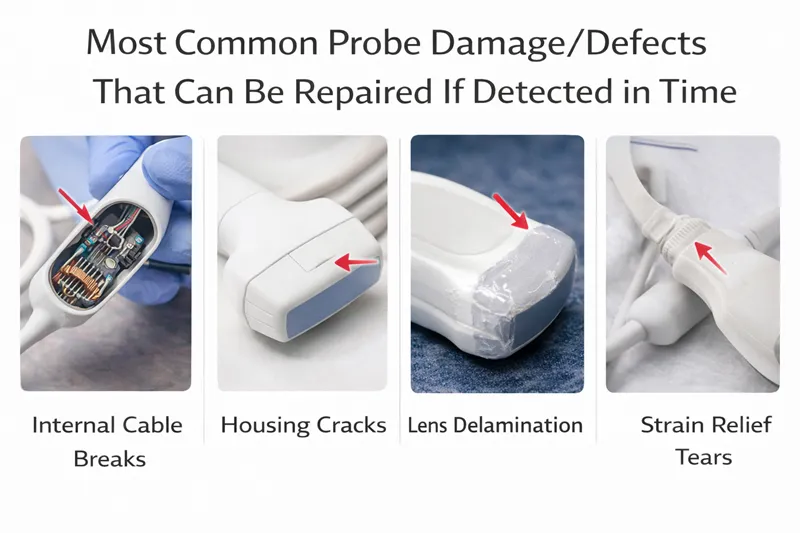
directly impacts image quality, diagnostic accuracy, and patient safety.
Unfortunately, ultrasound probes are also among the most fragile and expensive
parts of the system. The good news is that many probe damages and defects can
be repaired effectively if detected early.
Understanding the Structure of an Ultrasound Probe
An ultrasound probe is a complex assembly made up of several
delicate components that work together to generate and receive sound waves:
- Acoustic
Lens - The outermost surface that comes in contact with the patient
- Acoustic
Matching Layer - Ensures efficient transmission of ultrasound waves
- Piezoelectric
Elements (Crystals) - Convert electrical energy into sound waves and vice
versa
- Backing
Material - Controls vibration and signal clarity
- Cable
and Connectors - Transmit signals between the probe and the system
- Motor
Control & Locking System - Especially in 3D/4D and transvaginal probes
Damage to any of these components can compromise image
quality or render the probe unusable.
Most Common Ultrasound Probe Damages and Defects
1. Acoustic Lens Wear and Tear
The acoustic lens is constantly exposed to gel, cleaning
chemicals, pressure, and physical contact. Over time, it may develop:
- Cracks
- Cuts
or abrasions
- Swelling
or peeling
Impact: Poor contact with skin, image artifacts, reduced
resolution
Repair Possibility: Early-stage lens damage can often be
repaired or replaced, restoring probe performance.
2. Cable Damage and Fraying
Cable damage is one of the most common and easily overlooked
issues. Repeated twisting, bending, or improper storage can lead to:
- Exposed
wiring
- Internal
conductor breaks
- Intermittent
signal loss
Impact: Image dropouts, freezing, electrical safety risks
Repair Possibility: Cable repair or replacement is usually
possible if addressed early.
3. Connector and Pin Damage
The connector links the probe to the ultrasound system.
Damage may include:
- Bent
or broken pins
- Loose
connections
- Corrosion
due to improper cleaning
Impact: Inconsistent probe recognition, signal loss
Repair Possibility: Connector repairs are often feasible and
cost-effective if detected promptly.
4. Piezoelectric Element (Crystal) Failure
Piezoelectric crystals are responsible for producing and
receiving ultrasound waves. Damage may occur due to:
- Accidental
drops
- Excessive
pressure during scanning
- Aging
and prolonged usage
Impact: Dead elements, streaking, shadowing, reduced
penetration
Repair Possibility: Partial crystal failure can sometimes be
repaired; extensive damage may require replacement.
5. Acoustic Matching Layer Delamination
The matching layer ensures efficient sound transmission.
Over time, it may separate from underlying components due to:
- Moisture
ingress
- Chemical
exposure
- Mechanical
stress
Impact: Image artifacts, poor sensitivity
Repair Possibility: Early delamination can often be
corrected before permanent damage occurs.
6. Fluid Ingress Inside the Probe
Improper cleaning, disinfection, or damaged seals can allow
fluid to enter the probe housing.
Impact: Electrical shorts, corrosion, complete probe failure
Repair Possibility: If detected early, internal drying and
resealing may save the probe.
7. Motor Control and Locking System Issues
Common in transvaginal, TEE, and 3D/4D probes, motor-related
problems include:
- Mechanical
jamming
- Locking
failures
- Erratic
movement
Impact: Inaccurate imaging, probe malfunction
Repair Possibility: Mechanical repairs are often possible
when addressed early.
Importance of Early Detection
Timely identification of probe damage can:
- Extend
probe lifespan
- Reduce
costly replacements
- Maintain
image quality and diagnostic accuracy
- Ensure
electrical and patient safety
Regular visual inspections, image quality checks, and
preventive maintenance are essential.
Best Practices to Prevent Probe Damage
- Avoid
dropping or striking probes
- Store
probes in proper holders
- Use
manufacturer-approved cleaning agents
- Avoid
excessive cable bending
- Perform
routine inspections and testing
Frequently Asked Questions (FAQs)
Q1. How can I identify early damage in an ultrasound
probe?
Early signs include visible cracks on the lens, intermittent
image dropouts, lines or shadowing on the screen, loose connectors, or
inconsistent probe detection by the system. Routine visual and image quality
checks help in early detection.
Q2. Is it safe to use a damaged ultrasound probe?
No. Using a damaged probe can compromise image accuracy,
pose electrical safety risks, and potentially harm patients. Any suspected
damage should be assessed immediately by qualified service personnel.
Q3. Can all ultrasound probe damages be repaired?
Not all damages are repairable. Minor issues such as lens
wear, cable faults, and connector problems can often be repaired if detected
early. Severe crystal damage or extensive fluid ingress may require probe
replacement.
Q4. How can healthcare facilities extend the lifespan of
ultrasound probes?
Proper handling, correct storage, manufacturer-approved
cleaning methods, avoiding excessive cable bending, and routine preventive
maintenance significantly extend probe life.
Conclusion
Ultrasound probes are precision instruments that demand
careful handling and regular monitoring. While probe damage is common, many
defects ranging from lens wear to cable and connector issues can be repaired if
detected early. Proactive maintenance not only saves costs but also ensures
consistent image quality and patient safety.
At Aarogyaa Bharat, we emphasize awareness, preventive care,
and reliable medical equipment practices to help healthcare facilities deliver
uninterrupted and high-quality diagnostic services.